Restoration Hardware Inspired Nightstand - IKEA Rast Hack
/Disclosure: This is a sponsored post for Hickory Hardware and Leather Hide Store. It contains affiliate links so you can find the products I'm sharing easily. All opinions about these products are entirely my own. Please see full disclosure policy here.
It's Themed Furniture Makeover Day and it's all about CHOCOLATE this month.

Perfect topic for the month of February since I bet we're all on chocolate overload from Valentine's Day. Not that I'm admitting to eating my fair share.

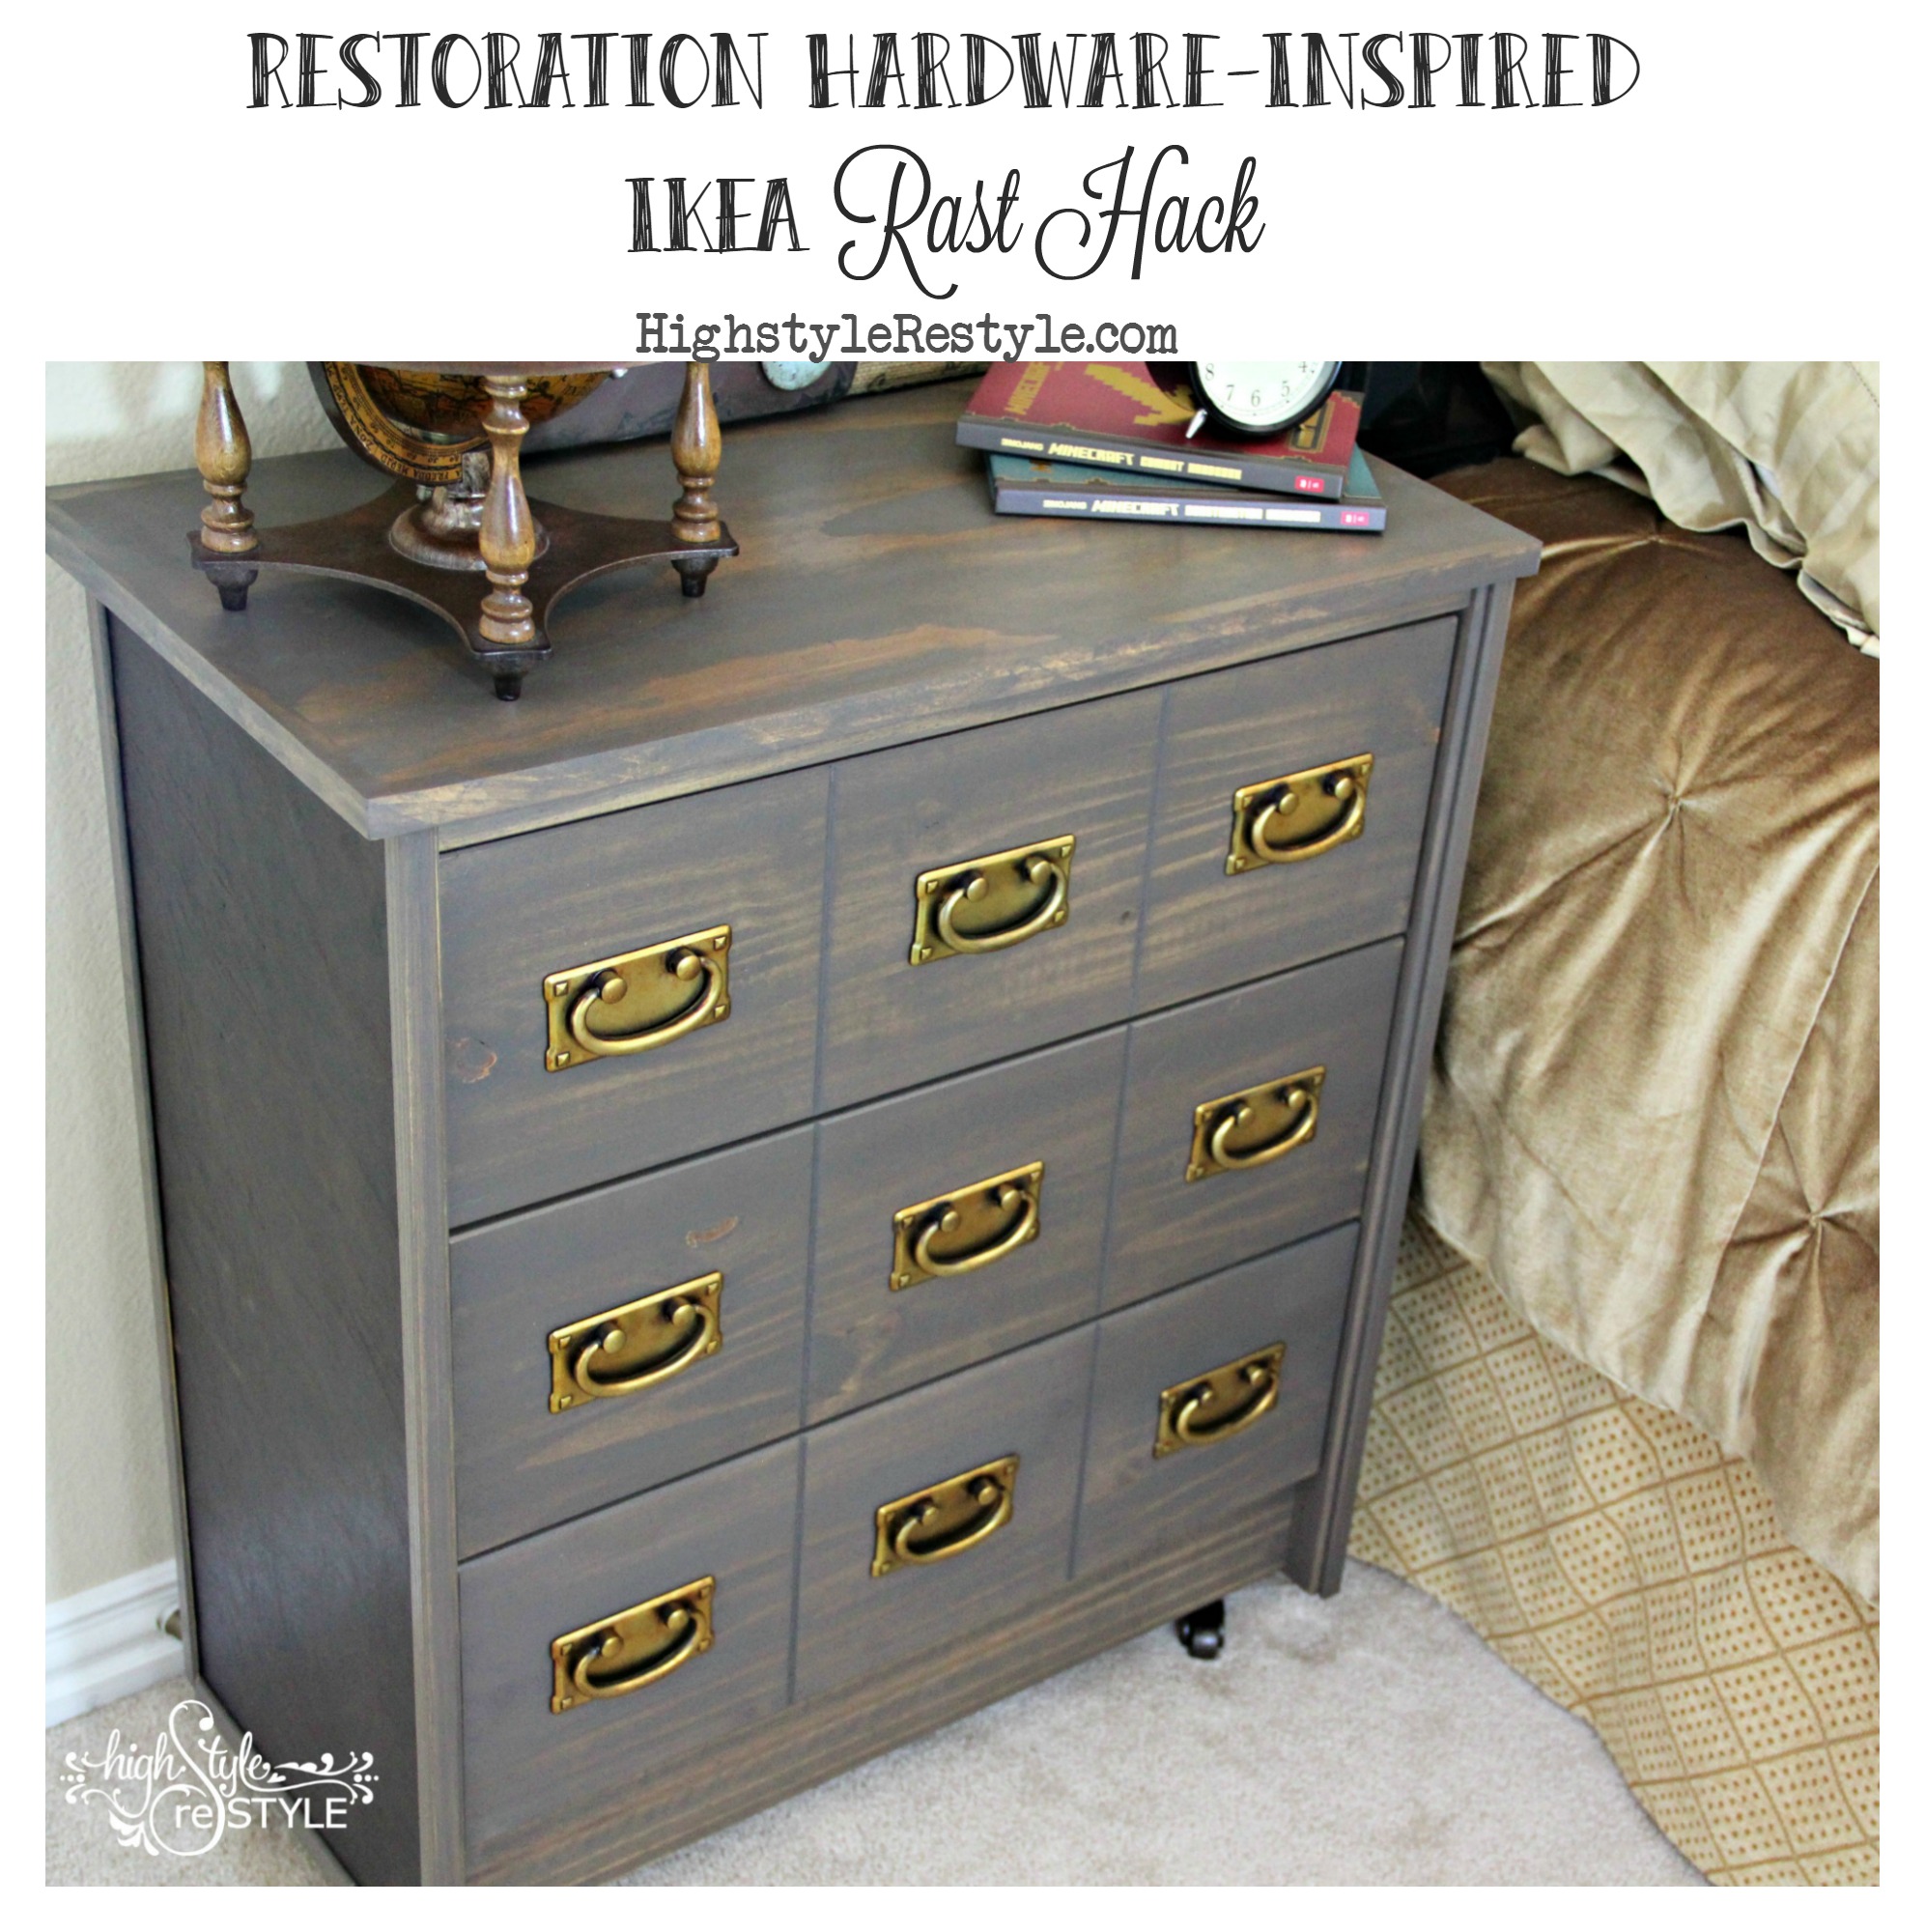
Last month, my makeover was a Restoration Hardware-inspired pedestal table. I must have Restoration Hardware on the brain because today I'm sharing an IKEA Rast hack of their Marseilles nightstand.

RESTORATION HARDWARE MARSEILLES CLOSED NIGHTSTAND
The basic design of the Rast dresser makes it a perfect inspiration piece for higher-end knockoffs. As part of a Hickory Hardware IKEA Rast Hack contest, a group of bloggers were sent the dresser, the hardware of our choice and a gift card to purchase any remaining supplies. Here's what I used to create my Restoration Hardware-inspired nightstand:
- 12 ft. outside corner trim
- Spray adhesive
- Wood glue
- Chopsticks (trust me on this)
- Dowels to attach casters
- Varathane Wood Stain in Briarsmoke
- Polyurethane

IKEA RAST
This beautiful leather came from the Leather Hide Store. I chose this style because it was closest to the Marseilles nightstand. As high-end upholstery leather it is buttery soft and the grain has a fantastic worn and weathered appearance.

brown 854 from leatherhidestore.com
I started by tracing the side panels of the Rast onto the leather with sharpie. Then I cut along the outline and mounted with 3M spray adhesive.

Since I was adding outside corner trim on the four sides of the dresser, the cut edges of the leather would be hidden.

My vision was a slightly modified version of Restoration Hardware's Marseilles nightstand. We started with this flat panel drawer front.

Using a router, Triple Threat created three faux-apothecary sections on each of the drawers.

The holes for the knobs included with the Rast were pre-drilled for two on each drawer. Since we now had three sections, the original hardware holes needed to be filled. I'm excited to share with you an easy way to fill holes WITHOUT using wood filler.

One of my favorite painting tips (until now) is using chopsticks to stir small cans of paint or stain. Did you know they are also the perfect size to use as tiny dowels to fill hardware holes?!!
Start by inserting the chopstick into the hole as far it will go. With a pencil, mark off the top and bottom section and then remove the chopstick. Cut off the marked section of the chopstick, apply wood glue and insert into hole.

I used a mallet to pound the chopstick dowel snugly into place. Once dry, I sanded the excess flush with the drawer. The plug is barely visible now but once the stain is applied, it's almost undetectable.

The original top of the Rast is inset so to give our knockoff a more polished and upscale look, Triple Threat built a bigger top with a finished edge trim.

I found a new favorite color for stain...Briarsmoke by Varathane. It's the perfect combination of brown and gray for a natural driftwood appearance. I'm completely giddy over the contrast between the stain and leather. I stained all the pieces of the dresser before assembling it.

Since I wanted to add Hickory Hardware casters, Triple Threat needed to add supports and dowels in order to mount them. Can you see how much richness the leather sides adds to this piece?

Bless Triple Threat and all his patience in assembling IKEA furniture. He is worth his weight in gold I tell you for helping me put it all together! The bigger top adds more space and depth to our Restoration Hardware knockoff.

Adding corner trim to frame the leather sides gives the panels a finishing touch, don't you think?

Before selling this piece, I think we're going to add more trim to the bottom front. Molding and hardware really is jewelry for furniture.

Staining the inside of the drawers really finishes off this piece and makes it seem way more expensive than the original Rast.

I am crushing on these Bail pulls! The antique gold finish coordinates so well with the Briarsmoke stain.

My version of the Marseilles dresser had a slight twist on the original. I added just enough leather to add character and still have a durable, usable table.
I hope you learned a new tip from this project and if you did, please share with your friends! Speaking of friends, my fellow bloggers worked hard on their themed makeovers so I hope you check out some of their amazing work!

Enter below to win a $50 gift card to the Leather Hide Store so you can create beautiful projects with leather too! {Giveaway open to US residents, age 18 and older. Contest runs February 25-28, 2016. Winner will be verified and then notified by email and will have 24 hours to respond.}